How to create product ranges with the Product Variant Builder
Create product variants in seconds
This guide will show you how to create a variant product within your Point of Sale.
If you have not already set up your classes for Variant Products, please follow the guide here.
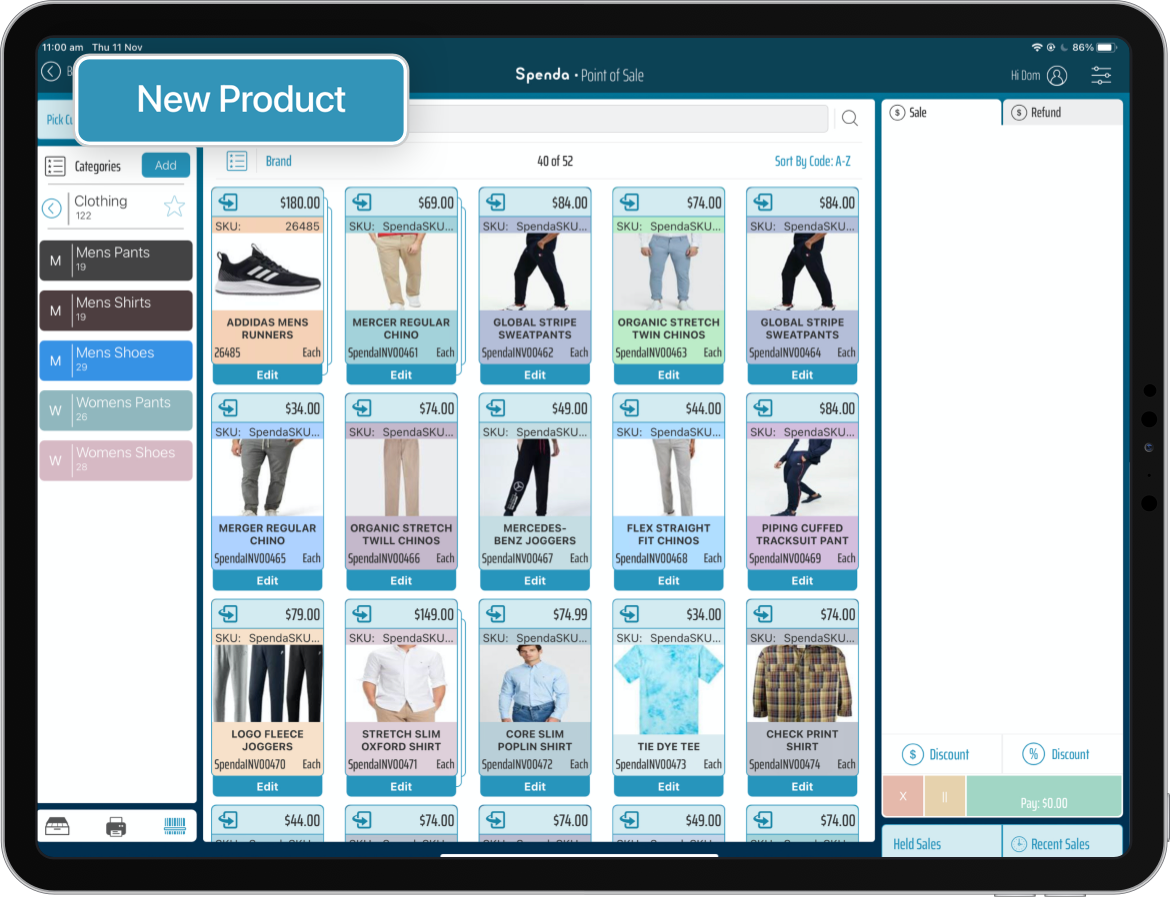
- On Spenda Point of Sale, navigate to Sales and select New Product.
- This product will be your Master Product. This is a non-posting/non-physical product which will act as the umbrella product to all your variants. For this reason, we give it an overarching name. In this example, we will use milk as our Master Product.
- Give your Master Product a name (e.g Hat), enter a code, SKU, UOM, Description, and select your class (depending on which class setup you went with, choose the one you selected for your Master Products).
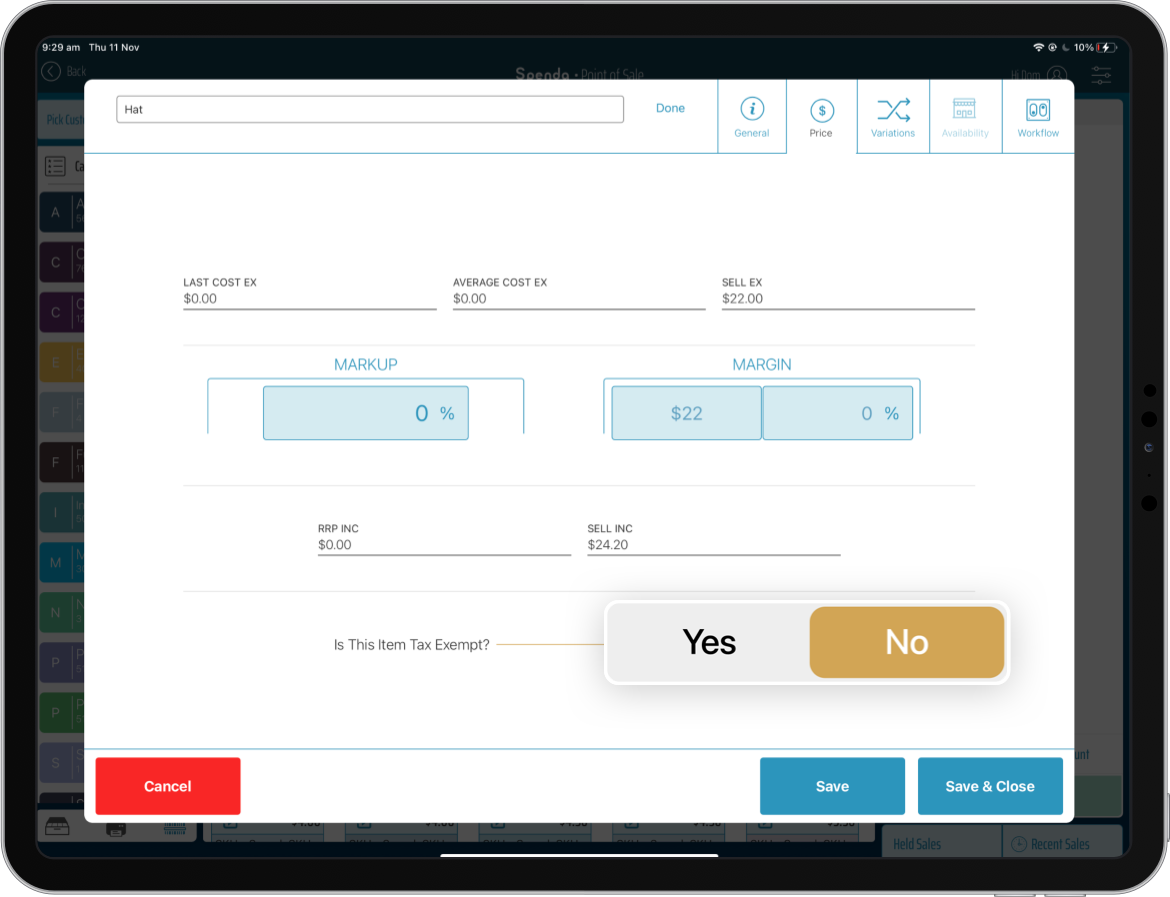
- Now select the Price tab, enter your Sell Tax Inclusive price. You will have the option later to adjust your price based on your product variant. Select Yes or No to ‘Is this item tax-exempt?’
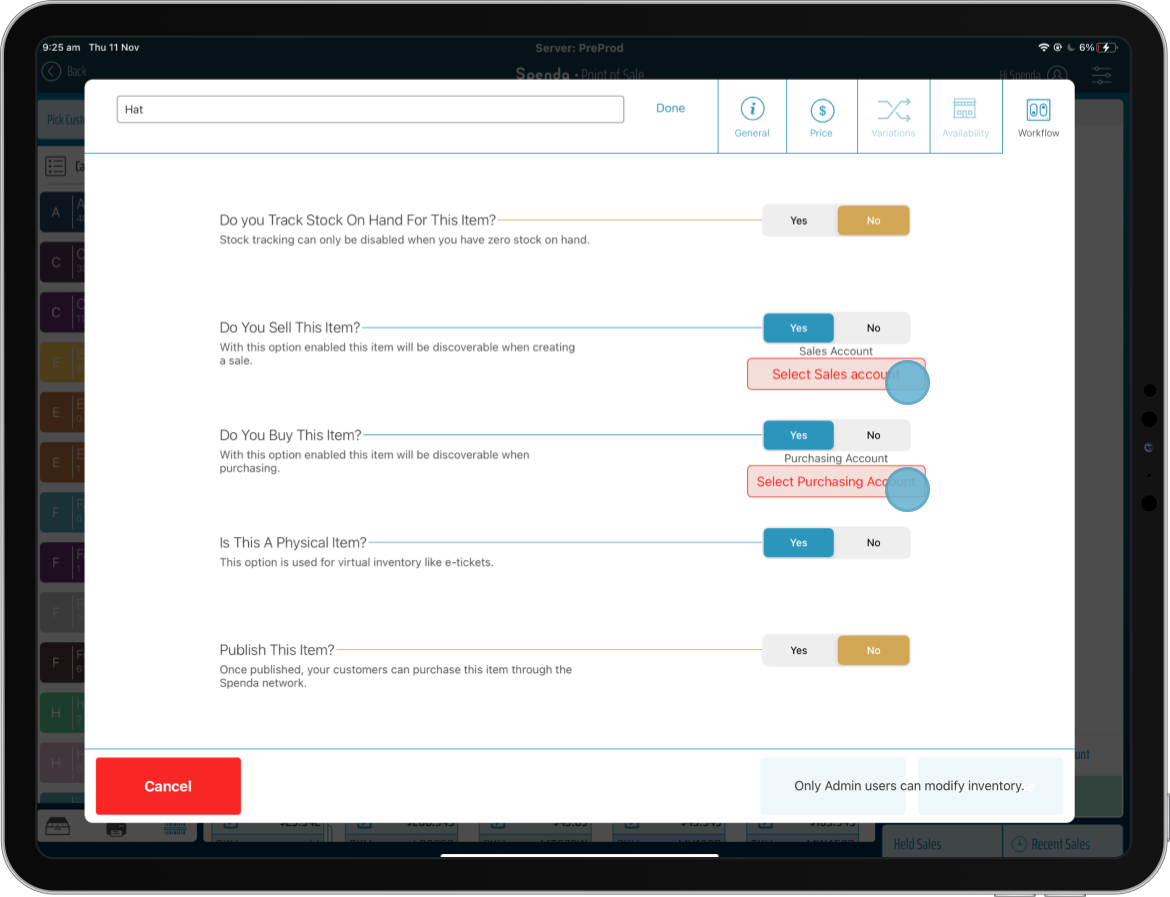
- If you selected a Generic/Departmental posting Class, you can skip this and move on to the next step. Next, select the Workflow tab. As you have selected natural/account posting, you will need to select a Sales Account and Purchasing (Revenue) account.
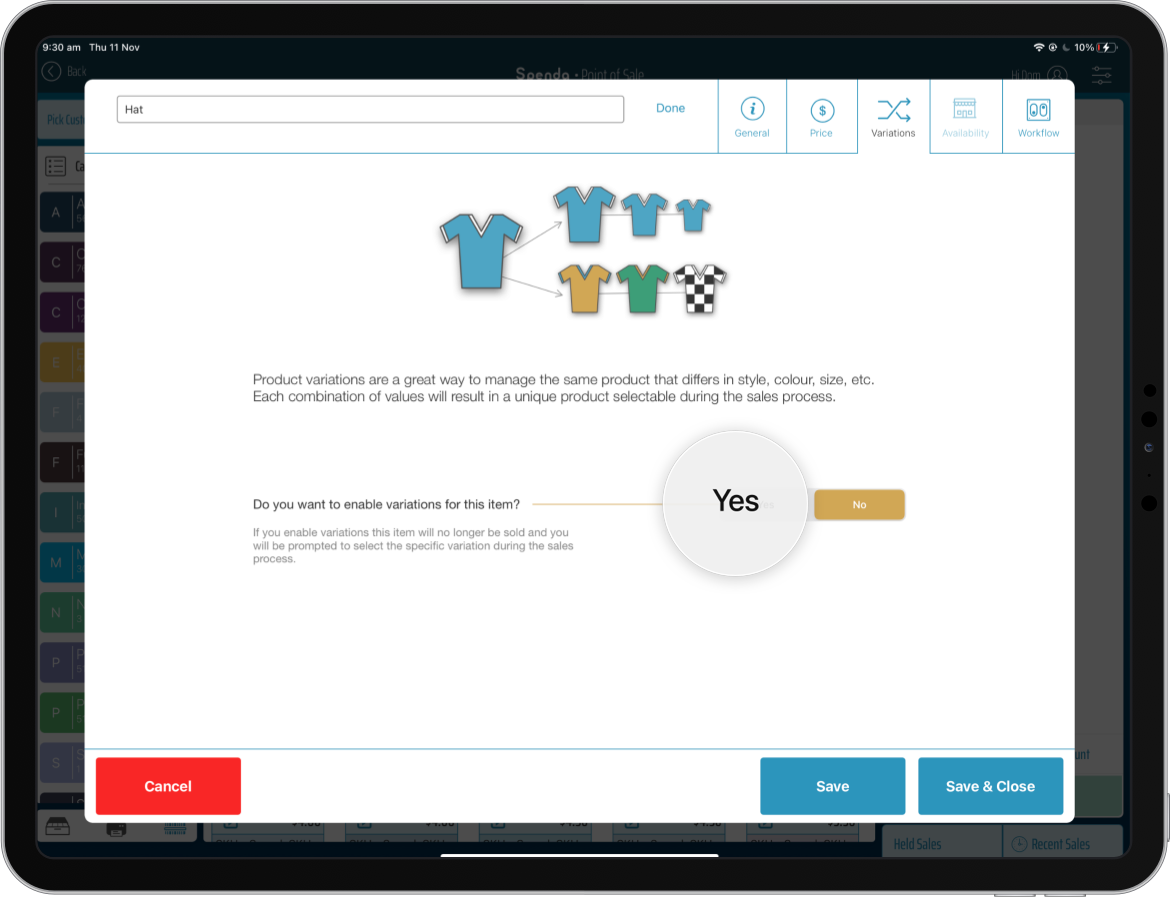
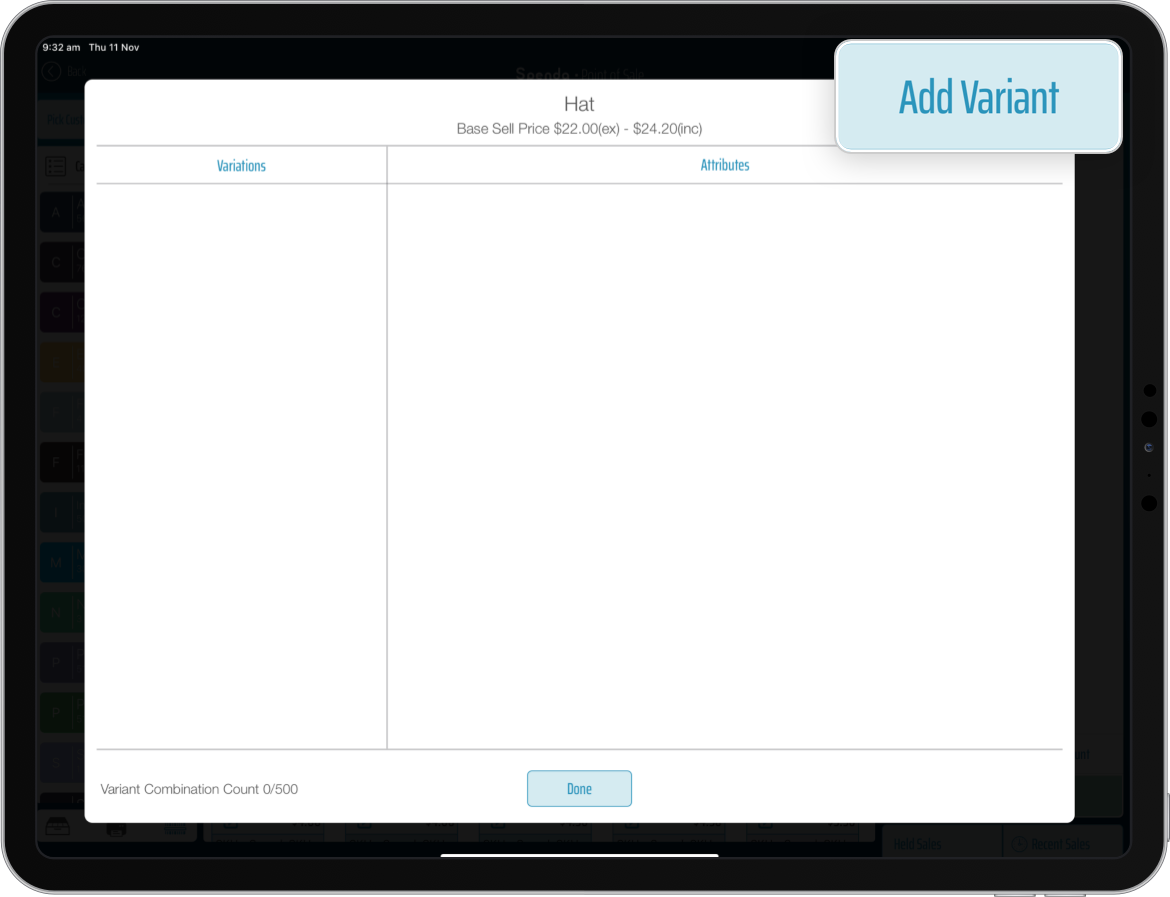
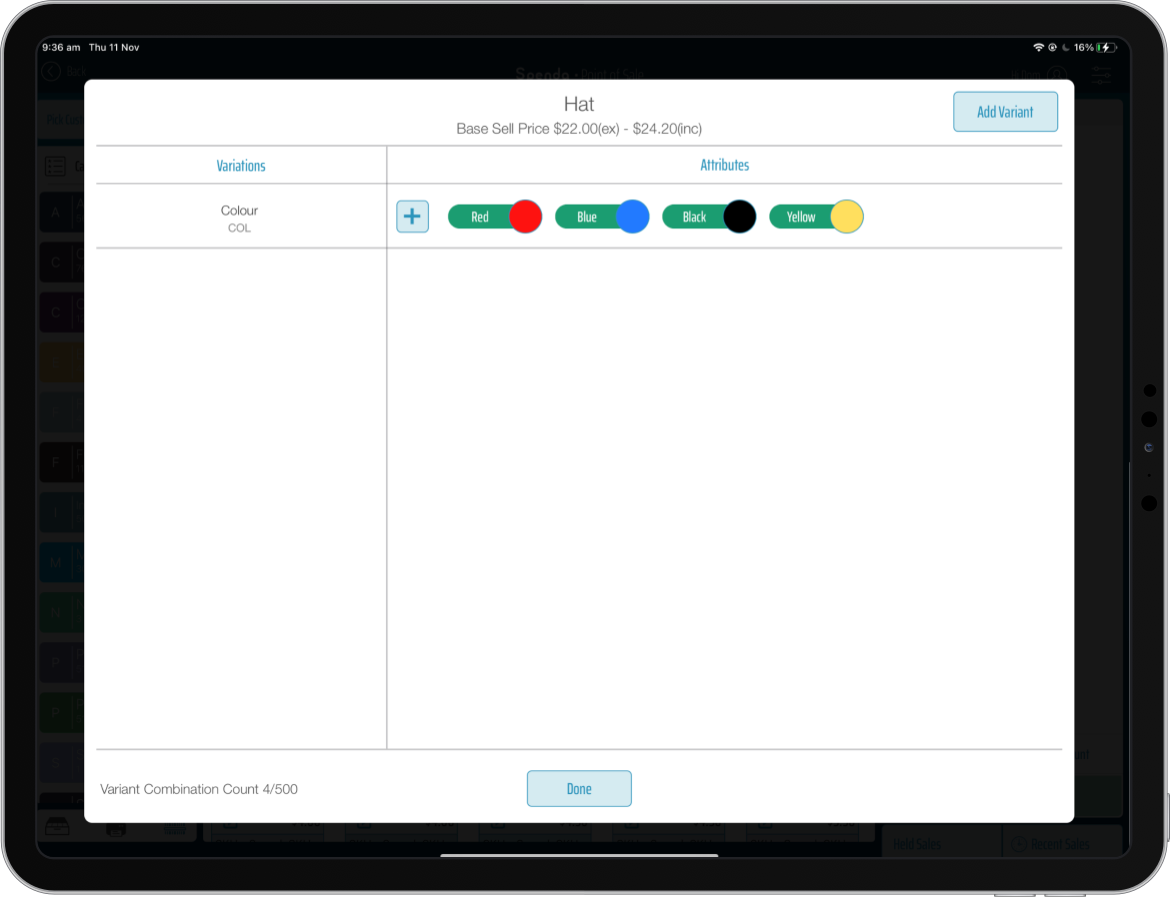
- Select the Variations Tab. Under the section, ‘Do you want to enable variations for this item?’ select Yes and Make Master. This will load the product variation builder page.
- This is the Product Variation Builder. Here, you will create your variations and attributes.
Variants = variant categories of the products e.g Size, Colour, Flavour, etc.
Attributes = The individual attributes of those variations e.g. Red, Blue, Green.
Click “Add Variant” in the top right-hand corner. The order in which you add variations matter when adding the product to the sale. So try to add the most important variations at the top followed by the least important. You can rearrange this by clicking and dragging on the variations name.
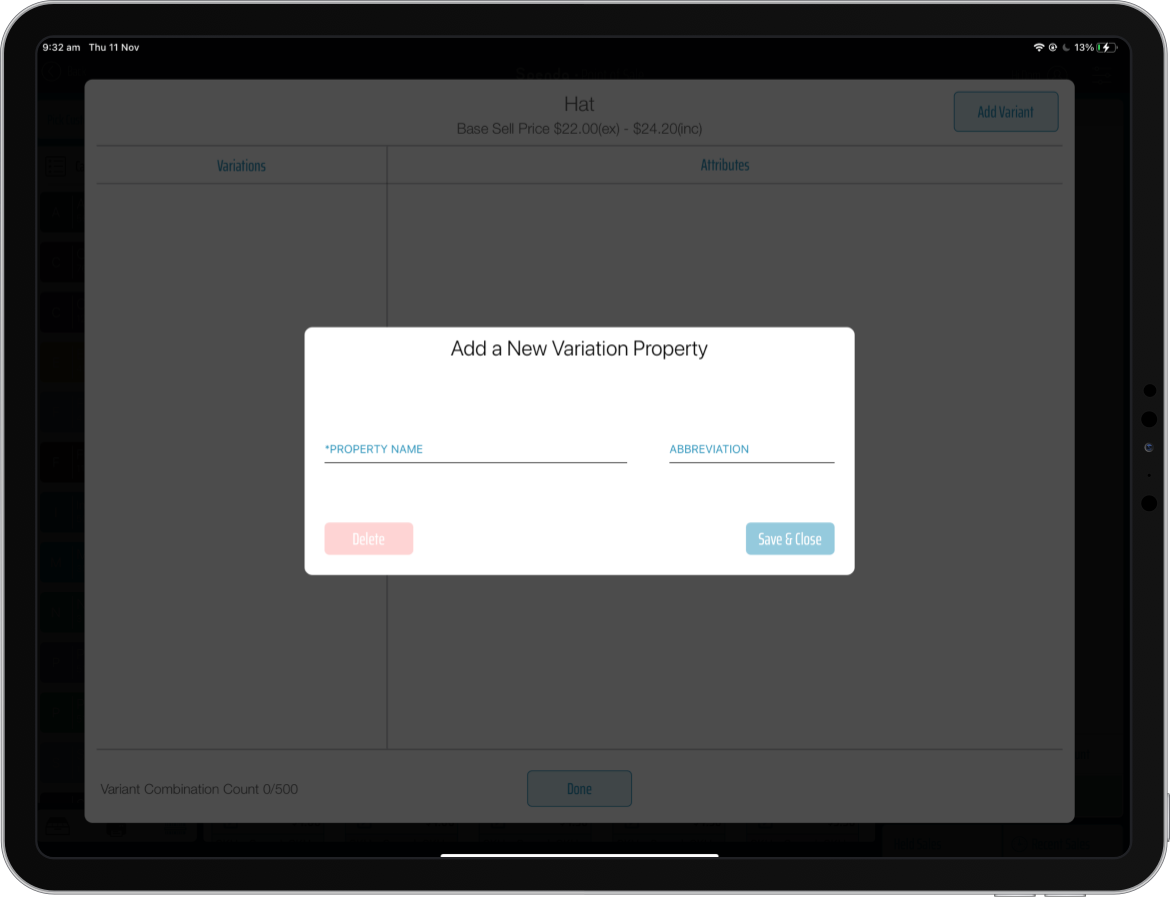
- Add in your property (Variant) name and abbreviation (3 characters max).
For example: you could put Size (small, medium, large), Colour (red, blue, green), and Type (cotton, polyester) of material. Add in as many Variants as you need for your products.
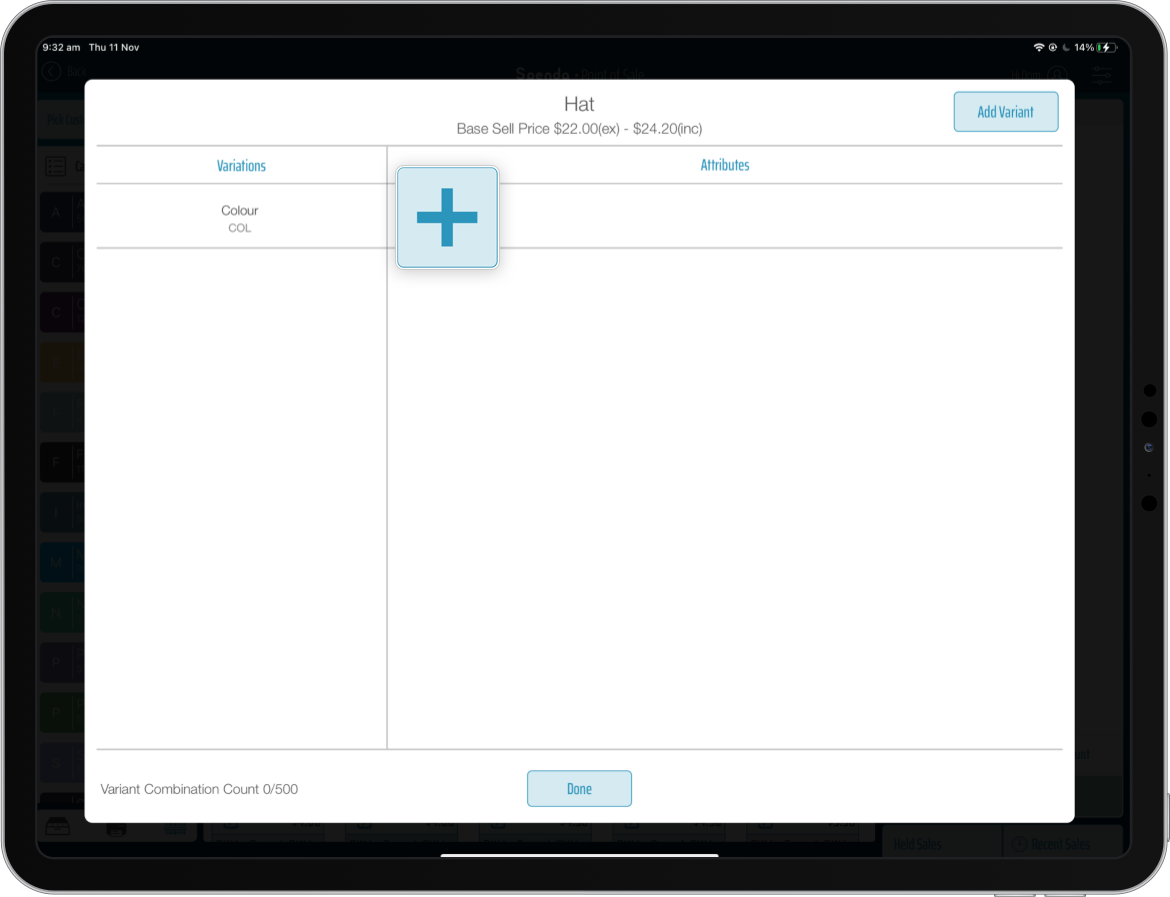
- Once you have selected your property name, click on the + symbol to add attributes to the property.
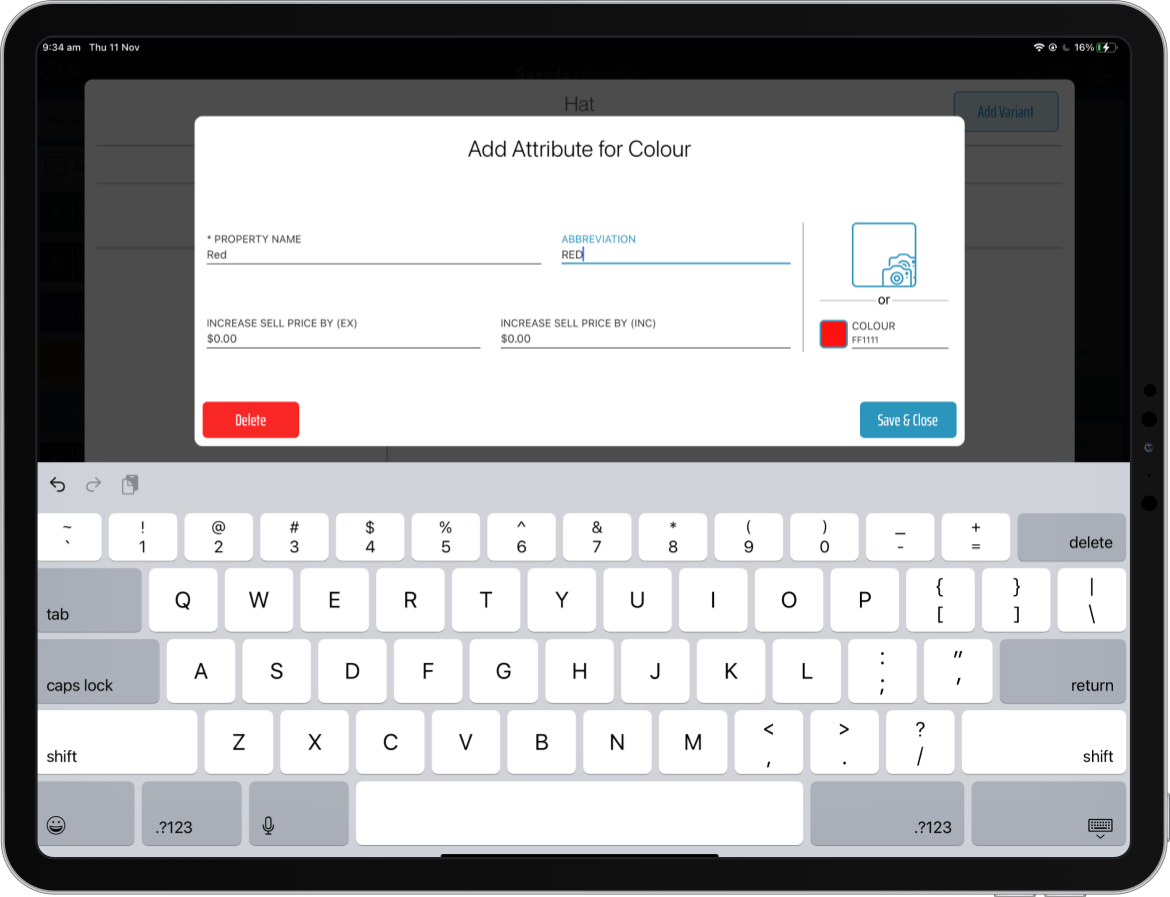
- You will now need to fill in the details of your attribute.
• Property Name
• Abbreviation
• Add a photo (optional)
• A colour (if applicable)
• Price increase (if applicable). Select $0 if you wish to keep the price the same as the Master product.
Whatever price you add here will be added on top of the master product price.
For example: the Master Product price is $1 and the attribute price is $0.65. When this product is selected for sale, it will cost $1.65.
You can add in as many attributes to your variant as you need.
- Once you are happy with all of your variants and attributes, click on “Done”.
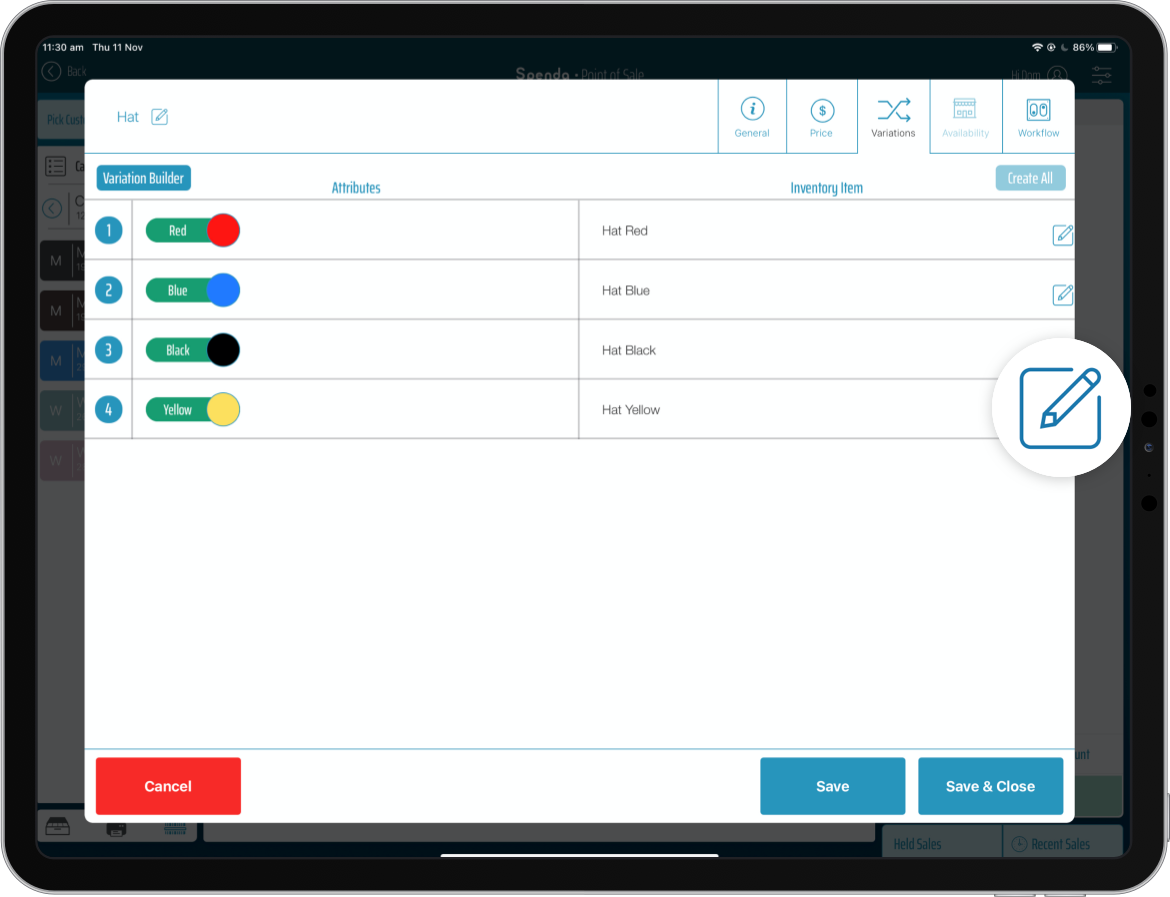
- Now every combination of your variants and attributes are rowed to make a product.
You can either select an existing product or create a new item:
Select an existing product: If there is a product listing for Chocolate Milk 500ml, you can select it by clicking “Use Existing” and it will use the predetermined products classing.
Create a new item: This will create a new product for this variation type. If you select “Create New Item” on a single product, the product will be attached to the same class as your MASTER product. This is to simplify the process for you.
Create all: This will create every possible product variant combination in one go.

- Skip this step if you did not choose to go with “Create all”. This step will be broken down into multiple sections, depending on what class setup you choose to go with.
Generic Master Class: Once you click Create All, all of your products will be assigned to the same Generic Class as your Master product. Continue to the next step.
One Account Master Class: You will be presented with the screen below, if you wish to only have one “Account Master Class” and have all your variant products posting naturally under that one class. Please select the first option “Post all variant children to Xero” on the left-hand side.
Account Master Class and existing generic Class: If you wish to post your variant products under an existing generic class, please select the middle option “Post all variants through an existing generic class”.
e.g. You’ve created variant products for milk, you want the variant classing for those products to be “Perishables” which already exist within your system. When you click on the button, you will be presented with “Select Class” and your generic classes will be available to select.
Account Master Class and New Generic Class: If you wish to create a new generic class for all of the variant products you’ve built, select the last option “Post all variant children through a new generic class”. Give the Class a name. Then click “Create all children”.
- You can now see a list of all the products created from your variants/attribute combinations. If you need to edit or change anything, you can click on the pencil next to each product. Once done, click Save and Close.
Congratulations! You’ve now created variant products!
To learn how to add a Variant Product to a sale, follow this guide.
This guide will show you how to create a variant product within your Point of Sale.
If you have not already set up your classes for Variant Products, please follow the guide here.
Variants = variant categories of the products e.g Size, Colour, Flavour, etc.
Attributes = The individual attributes of those variations e.g. Red, Blue, Green.
Click “Add Variant” in the top right-hand corner. The order in which you add variations matter when adding the product to the sale. So try to add the most important variations at the top followed by the least important. You can rearrange this by clicking and dragging on the variations name.
For example: you could put Size (small, medium, large), Colour (red, blue, green), and Type (cotton, polyester) of material. Add in as many Variants as you need for your products.
• Property Name
• Abbreviation
• Add a photo (optional)
• A colour (if applicable)
• Price increase (if applicable). Select $0 if you wish to keep the price the same as the Master product.
Whatever price you add here will be added on top of the master product price.
For example: the Master Product price is $1 and the attribute price is $0.65. When this product is selected for sale, it will cost $1.65.
You can add in as many attributes to your variant as you need.
You can either select an existing product or create a new item:
Select an existing product: If there is a product listing for Chocolate Milk 500ml, you can select it by clicking “Use Existing” and it will use the predetermined products classing.
Create a new item: This will create a new product for this variation type. If you select “Create New Item” on a single product, the product will be attached to the same class as your MASTER product. This is to simplify the process for you.
Create all: This will create every possible product variant combination in one go.
Generic Master Class: Once you click Create All, all of your products will be assigned to the same Generic Class as your Master product. Continue to the next step.
One Account Master Class: You will be presented with the screen below, if you wish to only have one “Account Master Class” and have all your variant products posting naturally under that one class. Please select the first option “Post all variant children to Xero” on the left-hand side.
Account Master Class and existing generic Class: If you wish to post your variant products under an existing generic class, please select the middle option “Post all variants through an existing generic class”.
e.g. You’ve created variant products for milk, you want the variant classing for those products to be “Perishables” which already exist within your system. When you click on the button, you will be presented with “Select Class” and your generic classes will be available to select.
Account Master Class and New Generic Class: If you wish to create a new generic class for all of the variant products you’ve built, select the last option “Post all variant children through a new generic class”. Give the Class a name. Then click “Create all children”.
Congratulations! You’ve now created variant products!
To learn how to add a Variant Product to a sale, follow this guide.
Related Articles
How to Create an Account Customer
How to Create an Account Customer Instructional video also included below for easy reference Account Customers within Synkd, directly link to your customer records in your accounting system. Here's how we create an Account Customer; 1. Locate and ...How to Create an Operational Customer
How to Create an Operational Customer Operational Customers do not get pushed to your accounting system. They're simply linked to an ‘Account Customer’ record, which resides on your accounting system. The main aim is to create a "Digital Firewall" ...How to Create a Product Class
How to Create a Product Class Product Classes are used to dictate how products will post to the financial system. Natural Posting: An item in Synkd will be 1 for 1 in the financial system, any item you add or edit in Synkd will update in the ...Create a Departmental Posting Item
Create a Departmental Posting Item Departmental Posting can be used for the following purpose; Multiple items within Synkd can be allocated into a Product Class in your financial system. This will aggregate revenue increases as a group total. Keep in ...How to create a new sales order
To create a new order, click the ‘Create Order’ button at the top right of your dashboard. Use the search bar to assign the order to an existing customer or use the ‘+’ button to create a new customer. If selecting an existing customer, their ...